
- JavaParaTrooper
- Earth
- Email is hidden.
3266
Points
Questions
3
Answers
164
-
Use the shortcut key CTRL+9 to turn on the command line ( CMD+3 in AutoCAD for Mac). If this fails to get the command line to appear, it may be that it is coming up off the side of your screen.
To Completely Reset your AutoCad Installation Please Check:
- 2194 views
- 1 answers
- 0 votes
-
To Change the Scale of the drawing in AutoCad:
- At the Command prompt, enter AMOPTIONS.
- In the Options dialog box, select the AM:Standards tab.
- In the Scale box, enter a new scale
- Click OK until all dialog boxes close.
To properly scale the image to the appropriate dimension, you can use either of the following procedures:
- ALIGN (Command)
- Draw a line that is at the proper length (Ex: If the dimension shows 25′, draw a line at that length)
- Type ALIGN into the command line and press Enter
- Alternatively you can find this command on the Modify Panel on the Home Tab in the Ribbon
- Select the image you want to scale and press Enter
- Specify the first source point, and then click the corresponding destination point.
- Specify the second source point, and then click the corresponding destination point
- Press Enter to continue
- Select Y for yes to scale the objects based on the alignment points
- SCALE (Command)
- Type SCALE into the command line and press Enter
- Alternatively you can find this command on the Modify Panel on the Home Tab in the Ribbon
- Select the image you want to scale and press Enter
- Click at the base point
- Press R for reference
- Click at the first point of the known dimension, then select the end point of said dimension
- Enter the “true length” of said dimension and press Enter
- Type SCALE into the command line and press Enter
- 5794 views
- 2 answers
- 0 votes
-
Solution:
- On the command line type PICKFIRST and change the value to 1
- Type PICKADD and change the value to 2.
- 2380 views
- 2 answers
- 0 votes
-
Verify that the Licensing service is running.
- Access the Windows Run box.
- Type Services.msc and press Enter.
- Search for FLEXnet Licensing Service or FLEXnet Licensing Service 64.
- Make sure the services are started and running.
(If they are disabled, they will prevent the program from starting.)Inspect the contents of productname201xENUAdlm.log
- Find this file at one of the following locations:
Vista/Windows 7/8/10:
C:\ProgramData\Autodesk\ADLM- The error will typically be:
Reason=Fatal error

ComputerName=COMPUTER

OS=5.1.2600.Service Pack 2

File=AdlmIntSATSLicense.cpp,Line=1150

AdlmIntError=38 [Error getting license usage and behavior]
or:
Reason=Fatal error

ComputerName=COMPUTER

OS=5.1.2600.Service Pack 3

File=AdlmIntSATSLicense.cpp,Line=347

VendorID=2 [ADLMACT]

VendorError=101 [The license cannot be accessed/loaded/opened]
These errors indicate that the ADLM trusted storage file was corrupted when the program crashed.
- Rename the following file by adding a .bak extension at the end of the filename:
Vista/Windows 7/8/10:
C:\ProgramData\FLEXnet\adskflex_*_tsf.dataNote: You may need to enable ‘Show hidden Files’ to see adskflex files mentioned above. Refer to the Microsoft topic, Show hidden files, for more information.Warning: This file contains all activations for all 2010 and later products. You will need to re-register all your products if this file is renamed/deleted.
- Restart the program
It should automatically re-register and start up as expected. A new adskflex_*_tsf.data file will be created when you re-register your product.Uninstall the product (if the previous process does not help)
If you are still having problems, licensing file could be corrupt.
- Uninstall ALL Autodesk products on the machine.
- Delete the tsf.data file from step 3, above.
- Delete the Productinfromation.pit file from the following location:
Windows 7/8/10:
C:\ProgramData\Autodesk\ADLM\ProductInformation.pit- Re-install the program.
- 5271 views
- 2 answers
- 0 votes
-
The current named view is used to determine the render background. You can use solid colors, gradients, and raster images as backgrounds.
To change the background of the current named view
- On the View menu, click Named Views.
- Click New.
- Assign a name and configure the boundary and settings. If you want your background color to appear in modelspace, you must assign a 3D Visual Style.
- Select the Override Default Background check box. To change the background color only, set the Type to Solid and click the Color field under Solid Options. Select the color you want.
- Click OK three times to return to the View Manager dialog box.
- In the View Manager dialog box, select the new named view in the Views tree and click Set Current.
- Click OK.
You can now render using your new background.
- 6767 views
- 1 answers
- 0 votes
-
AutoCAD has some helpful information on this problem and a recommendation solution.Here’s a quick summary of how to fix it:
1. On the command line in AutoCAD, enter FILEDIA.
2. Type 1 for the value.You can read more over here: https://knowledge.autodesk.com/support/autocad/troubleshooting/caas/sfdcarticles/sfdcarticles/File-selection-dialog-boxes-do-not-appear-in-AutoCAD.html
- 2303 views
- 1 answers
- 9 votes
-
Hi Custom Shop!
In my experience there can be a number of reasons for this problem. I’ve found a quick Youtube tutorial to hopefully help you fix this problem.
If that doesn’t work there’s a few other things you could try here:
You can try to enable or disable hardware acceleration in AutoCAD. Here’s how How to enable or disable hardware acceleration in AutoCAD).
You can look at changing some of the control variables in AutoCAD by setting these using the command line:
ORTHOMODE = 0

PROPERTYPREVIEW = 0

ROLLOVERTIPS = 0

SELECTIONCYCLING = 0

SAVEFIDELITY = 0

QPMODE = 0

SNAPMODE = 0

SELECTIONPREVIEW = 0

UCSDETECT = 0

DYNMODE = 0
It’s always a good idea, like with Windows to install the latest AutoCAD service packs from the AutoCAD Downloads page.
If all that fails, and you’ve already tried another mouse have a look at this AutoDesk forum post with feedback from another user with a similar problem. https://knowledge.autodesk.com/support/autocad/troubleshooting/caas/sfdcarticles/sfdcarticles/Cursor-is-slow-or-jerky-in-AutoCAD.html
Good luck!
- 30546 views
- 2 answers
- 6 votes
-
Enable Hardware Acceleration
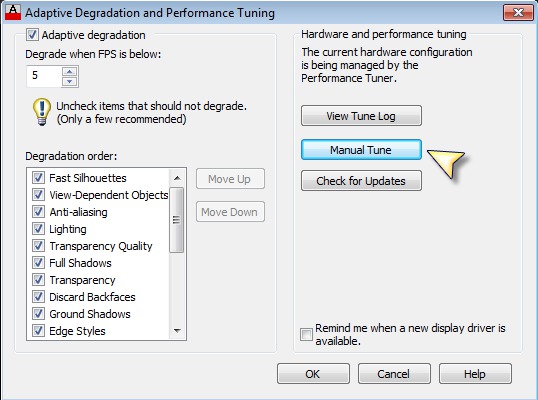
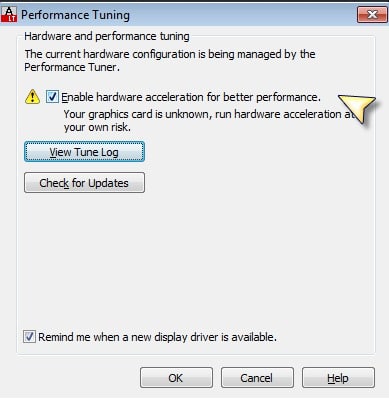
We recommend you Enable Hardware Acceleration if possible, which can be done in AutoCAD 2010 and above and AutoCAD LT 2012 and above by following the below steps:- Run the 3DCONFIG command
- Click the Manual Tune button for AutoCAD (Skip this step for AutoCAD LT)
- Check the Enable hardware acceleration button
- Click OK to exit both dialogs

AutoCAD
AutoCAD LT
Windows 7 Basic Theme
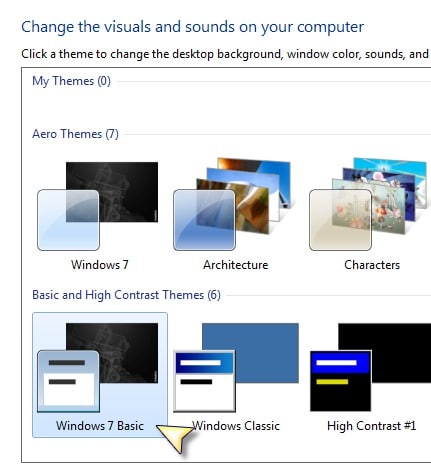
If Hardware Acceleration needs to stay Disabled, a secondary option is to ensure the Windows 7 Basic theme is selected in your Visuals and Sounds menu (applies to AutoCAD 2010 and AutoCAD LT 2010 and above):To do this:
- Right click on your Desktop
- Click Personalize
- Select Windows 7 Basic under “Basic and High Contrast Themes”
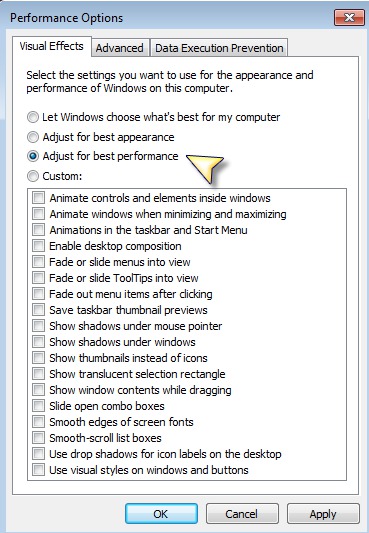
Next you should also turn off all the Visual Effects from the Performance Options dialog in Windows.
- Open Control Panel
- Search for adjust performance
- Click Adjust the appearance and performance of Windows
- Click Adjust for best performance
Dynamic Input Features
Finally in AutoCAD, turn off all Dynamic Input features, including dynamic prompts, by setting the DYNMODE system variable to 0- 15896 views
- 2 answers
- 0 votes
-
This issue only happens in Windows 7 and affects AutoCAD LT and all AutoCAD-based products where hardware acceleration has been turned off.
Solution:
Enable Hardware Acceleration
We recommend you Enable Hardware Acceleration if possible, which can be done in AutoCAD 2010 and above and AutoCAD LT 2012 and above by following the below steps:- Run the 3DCONFIG command
- Click the Manual Tune button for AutoCAD (Skip this step for AutoCAD LT)
- Check the Enable hardware acceleration button
- Click OK to exit both dialogs
AutoCAD
AutoCAD LT
Windows 7 Basic Theme
If Hardware Acceleration needs to stay Disabled, a secondary option is to ensure the Windows 7 Basic theme is selected in your Visuals and Sounds menu (applies to AutoCAD 2010 and AutoCAD LT 2010 and above):To do this:
- Right click on your Desktop
- Click Personalize
- Select Windows 7 Basic under “Basic and High Contrast Themes”
Next you should also turn off all the Visual Effects from the Performance Options dialog in Windows.
- Open Control Panel
- Search for adjust performance
- Click Adjust the appearance and performance of Windows
- Click Adjust for best performance
Dynamic Input Features
Finally in AutoCAD, turn off all Dynamic Input features, including dynamic prompts, by setting the DYNMODE system variable to 0- 4248 views
- 1 answers
- 5 votes
-
Step 1: Reset AutoCad to System Defaults :
Windows 7 Operating System:
For most versions of AutoCAD 2012 and later (including AutoCAD-based products), the reset utility can be found in the AutoCAD program group located in the Windows Start Menu:
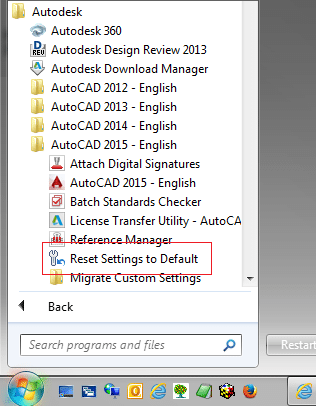
- Start menu > All Programs > Autodesk > AutoCAD 201x > Reset Settings To Default.
The reset utility gives you the option to back-up your settings first. Once the reset is complete, AutoCAD automatically opens and initiates its secondary installer
Windows 8 Operating System:
- Click the Windows button to access the Start Screen.
- Right-click the bottom of the screen.
- Click the down arrow to access all the installed apps.
- In the AutoCAD section, click “Reset Settings to Default.”
Windows 8.1 Operating System:
- Click the Windows button to access the Start Screen.
- Move your cursor down and click the down arrow to access all the installed apps.
- In the AutoCAD section, click “Reset Settings to Default.”
Windows 10 Operating System:
- Click the Windows button to access the Start menu.
- Click ‘All Apps’
- Click the down arrow v to expand ‘Autodesk’.
- Scroll down and click on ‘Reset 201x Settings To Default’.
AutoCAD 2011 and older on the Windows 7 and Windows XP Operating Systems:
For AutoCAD 2011 and older and versions that do not have the Reset utility, one must reinitiate the secondary installer (See Below)If the problem persists, try to repair the installation from the Control Panel
- On the Start menu (Windows), click Settings > Control Panel.
- In Control Panel, double-click Programs and Features.
- Select the Autodesk product, and then click Uninstall/Change.
- When the installer launches, click Repair.
- Follow the prompts to either repair the product.
Reinitiating the secondary installer procedure:
Manually resetting AutoCAD to defaults involves deleting two folders and a registry path. Here are the steps:
-
Exit out of AutoCAD.
-
If available, export your current settings to save them as a back-up. Do this by going to Start > All Programs > Autodesk > AutoCAD 20xx > Migrate Custom Settings > Export AutoCAD 20xx Settings. If there is no export utility, manually save a copy of the folders mentioned below.
-
Delete the following folders:
For Windows Vista and newer:
C:\Users\<user>\AppData\Roaming\Autodesk\AutoCAD 20xx
C:\Users\<user>\AppData\Local\Autodesk\AutoCAD 20xxFor Windows XP:
C:\Documents and Settings\<user>\Application Data\Autodesk\AutoCAD 20xx
C:\Documents and Settings\<user>\Local Settings\Application Data\Autodesk\AutoCAD 20xxNote: These paths contain hidden folders. You must turn on “show hidden files” in Folder Options to see them.
-
Press WINDOWS-R on the keyboard to bring up the Run window, enter REGEDIT and click OK.
-
Delete the following registry key (see warning below) (to manually save a backup, right-click > Export):
HKEY_CURRENT_USER\Software\Autodesk\AutoCAD\Rxx.x\ACAD-xxxx:40x
This path is unique for each version of AutoCAD. You can see what ‘ACAD-xxxx’ refers to by selecting the path and then looking at the keys on the right pane of the Registry Editor. One of the keys will show the install path to the associated version of AutoCAD. The ’40x’ number signifies the language version of AutoCAD.
-
Launch AutoCAD 20xx to have it rebuild its settings files.
You may be able to import your settings again to restore your AutoCAD settings if your AutoCAD version has an import settings utility. However, after doing this, if the original problem reoccurs, repeat the manual reset process and discard your exported settings.
Note: This process can be done for the newer versions of AutoCAD, even those with a reset utility, for instance, if the reset utility malfunctions or shows errors when run.
AutoCAD for Mac 2014 SP1 and later:
To reset the palettes:
- Click the Window menu and choose Reset Palettes or enter RESETPALETTES on the command line.
To reset the entire program:
- Hold down the Shift key while starting AutoCAD for Mac.
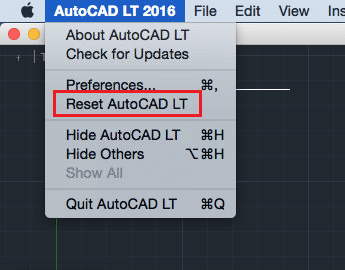
- In AutoCAD for Mac 2015 and newer, you may click the AutoCAD (or AutoCAD LT) menu and choose the option to reset the program.
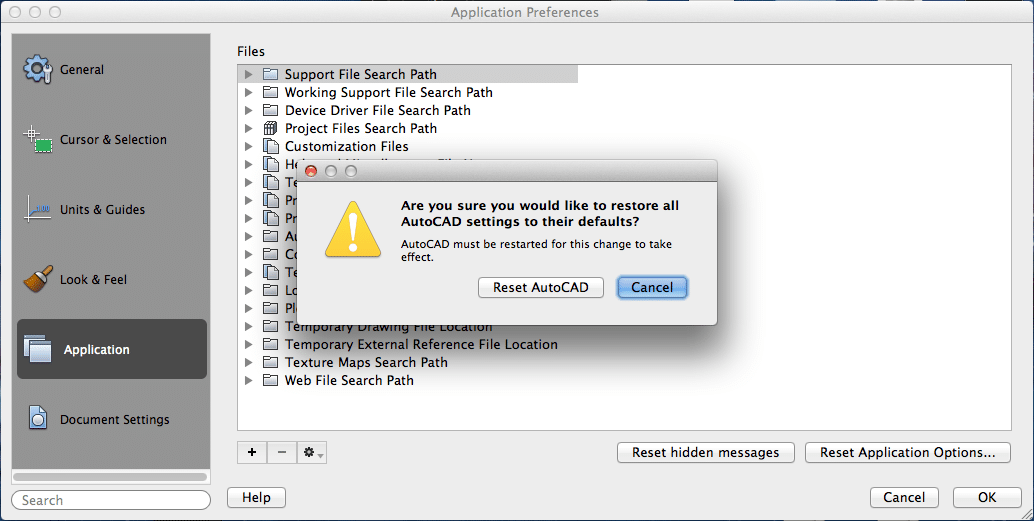
- For all versions of AutoCAD for Mac, do the following:
- Click Preferences under the AutoCAD menu.
- Click the Application tab.
- Click the button “Reset Application Options.”
- Click “Reset AutoCAD.”
- 19241 views
- 2 answers
- 0 votes


